

Quick Start Guide & Manual
Choose your device model and check your hardware setup & components
Hardware Installation
What’s inside the box?
Ports & Connectors
(Optional) VDC External Power Connector
The gateway is supplied with an external connector for additional power. It can be used to connect an external power source such as a photovoltaic panel or DC power supply. The connector supports a maximum voltage of 24VDC (optimal values between 12VDC and 24VDC) and a maximum input current of 3A.
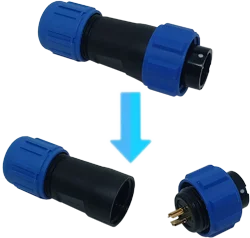
To access the connection and soldering PINs of the power cable, you must first disassemble the external component of the connector as shown in the figure. Then follow the diagram presented for the correct positioning of the cables.
We recommend using the “free spot” (white dot) as a reference element, positioned below at the top.

ATTENTION! PoE power does NOT recharge the gateway’s internal batteries. The batteries recharge automatically only if the power source is connected to the appropriate connector (n.6 in the diagram)
MAXIMUM VALUES ALLOWED
If powered by a DC power supply, use a maximum voltage of 24VDC (optimal voltage between 12VDC and 24VDC). In case of power supply via photovoltaic panel, the maximum values of this are indicated in the table alongside. We recommend a panel of maximum 50W at 12V.
| Rated Max Power (Pmax) | 50 W |
| Voltage at Pmax (Vmp) | 18.5 V |
| Current at Pmax (Imp) | 2.80 A |
| Open-circuit Voltage (Voc) | 23.50 V |
| Short-circuit Current (Isc) | 2.95 A |
Software Configuration
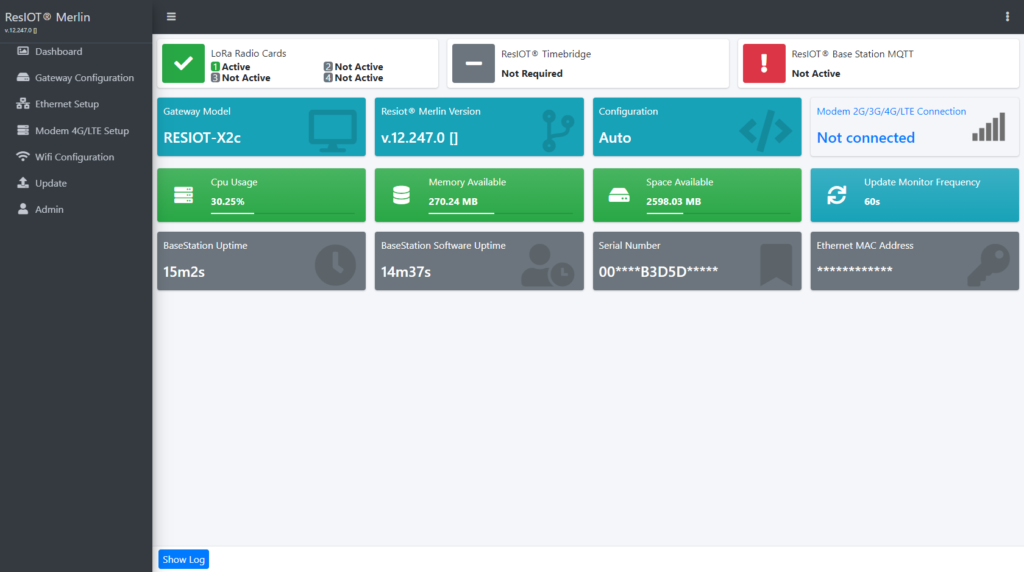
Gateway Default Parameters
The gateway is delivered with some essential parameters already preconfigured. Below you can find these values
.IP Address: 192.168.2.1 (Static)
.SSH Credentials: root (Username), for Password see the documents inside your gateway pack
.ResIOT® Web Panel Address: http://192.168.2.1:50056
.ResIOT® Web Panel Password: resiot1234
.MAC Address: printed on silver label on your gateway (ex. 60B3D5DF5000)
.Gateway Serial: 0000 + MAC Address (ex. 000060B3D5DF5000)
.RGRA Serial (ResIOT® Gateway Remote Access server): see the documents inside your gateway pack
.Gateway Configuration: AUTO, manage and monitor your gateway on login.resiot.io, ready to use ResIOT® LoRaWAN® Network Server & IoT Platform FREE CLOUD VERSION (click here to access)
Step 1. Gateway Registration
Step 1.1
Step 1.2
Step 1.3
Step 1.1
Click on this link to access the registration page (if you don’t have an account, please create a new one on our portal)
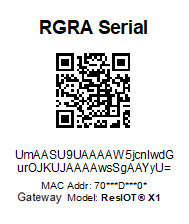
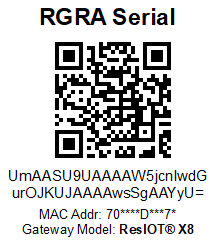
Inside your gateway box you should have received some documents with the RGRA Serial label sticked on them. Keep it next to you because it is necessary for the next step. The label looks like the one on the right.
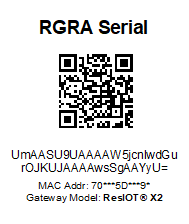
In this example RGRA serial is
UmAASU9UAAAAW5jcnlwdGurOJKUJAAAAwsSgAAYyU=
Step 1.2
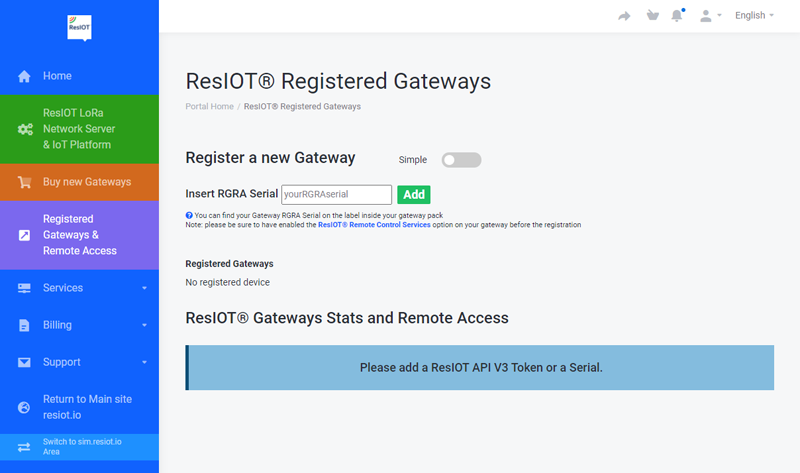
Paste your RGRA Serial inside the proper text box, like in the picture below and press the Add button. You can find your gateway RGRA Serial on a label pasted on the documents inside your gateway box. RGRA Serials will keep saved in this page for your account
Step 1.3
You have now successfully registered your gateway! Proceed with the next steps of this guide to discover how to use your new device
Note: when you complete your gateway registration, a new table is generated at the bottom of the page. With this table you can get your gateways last statistics and access your devices form anywhere!
Below an output example

Step 2. Gateway Accessing & Network Configuration
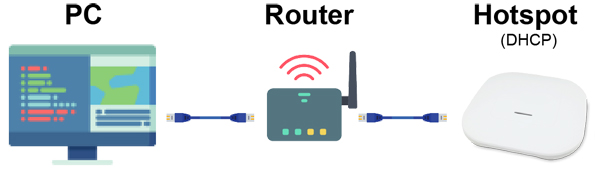
Cabled Connection
Step 2.1
Step 2.2
Step 2.3
Step 2.4
Step 2.1
Once the gateway is powered up, connect it with an Ethernet cable. The device IP address is 192.168.2.1. It is configured to use static address by default. To access the gateway, configure your PC with a static IP address within the following range: 192.168.2.2 – 192.168.2.254
Step 2.2
Open your browser, visit http://192.168.2.1:50056 and enter the web panel password (default is resiot1234 – we suggest to change it!).
Step 2.3

Modem 2G/3G/4G LTE Configuration
Step 2.1
Step 2.1
In case you have a Modem Device, you can setup the parameters by visiting the menu “Modem 4G/LTE Setup” on the left side of the screen and fill-in the box. Example below
Software Configuration
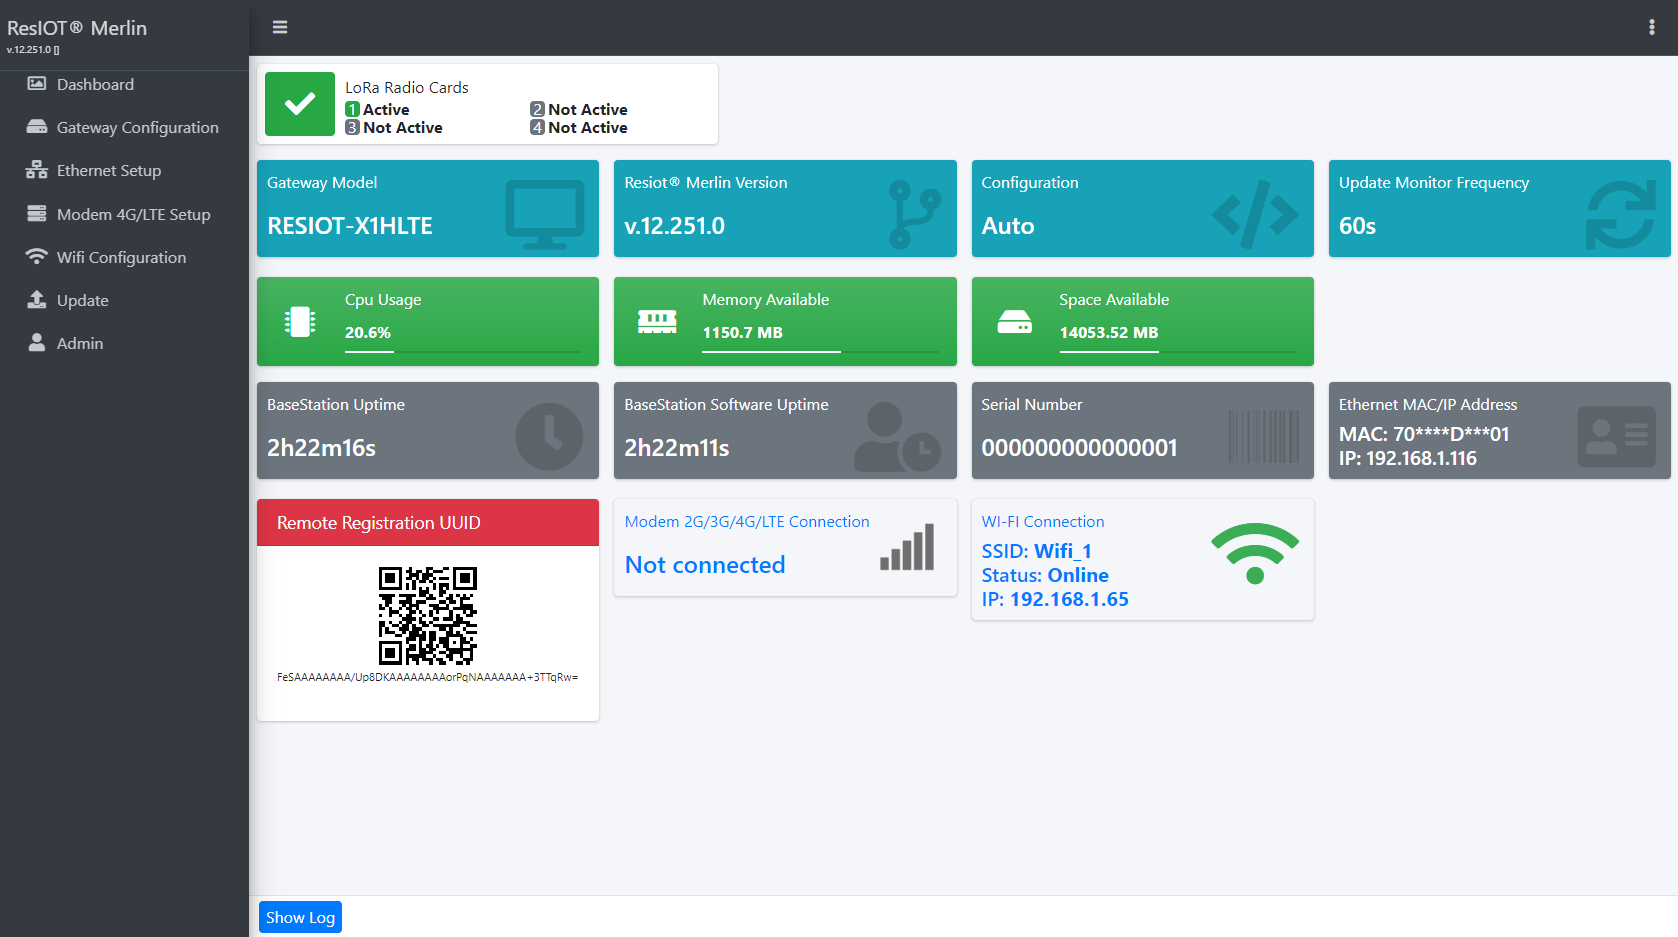
Gateway Default Parameters
The gateway is delivered with some essential parameters already preconfigured. Below you can find these values
.IP Address: DHCP (Dynamic)
.ResIOT® Web Panel Address: http://[your_gateway_ip] (example http://192.168.1.116)
.ResIOT® Web Panel Password: printed on silver label sticked to your gateway
.Eth MAC Address: printed on silver label sticked to your gateway
.Wifi MAC Address: printed on silver label sticked to your gateway
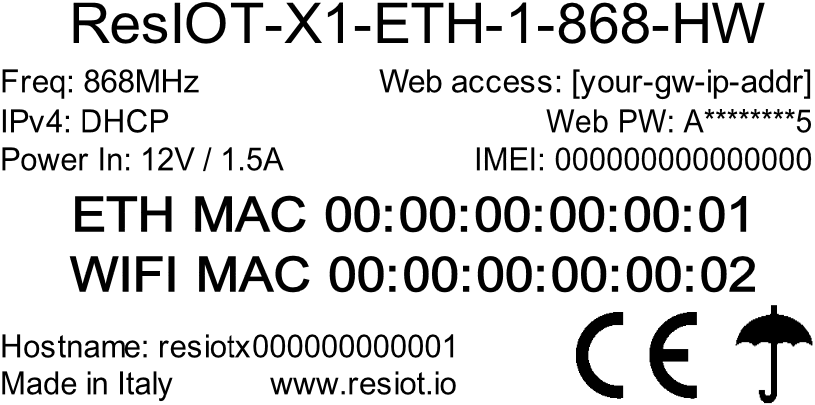
ResIOT® X1 Silver label example
Step 1. Gateway Registration
Step 1.1
Step 1.2
Step 1.3
Step 1.1
Click on this link to access the registration page (if you don’t have an account, please create a new one on our portal)
Inside your gateway box you should have received some documents with the RGRA Serial label sticked on them. Keep it next to you because it is necessary for the next step. The label looks like the one on the right.
In this example RGRA serial is
UmAASU9UAAAAW5jcnlwdGurOJKUJAAAAwsSgAAYyU=
Step 1.2
Paste your RGRA Serial inside the proper text box, like in the picture below and press the Add button. You can find your gateway RGRA Serial on a label pasted on the documents inside your gateway box. RGRA Serials will keep saved in this page for your account
Step 1.3
You have now successfully registered your gateway! Proceed with the next steps of this guide to discover how to use your new device
Note: when you complete your gateway registration, a new table is generated at the bottom of the page. With this table you can get your gateways last statistics and access your devices form anywhere!
Below an output example
Step 2. Gateway Accessing & Network Configuration
ResIOT® Web Panel access
Step 2.1
Step 2.2
Step 2.3
Step 2.1
Once the gateway is powered up, connect it with an Ethernet cable. It is preconfigured in DHCP mode, so you need to find its new IP address inside your network. The gateway MAC address can help you to identify the gateway among your other network devices.
Step 2.2
Open your browser, visit http://[your_gateway_ip]:50056 and enter the web panel password you can find on the gateway silver label

Cabled Connection
Step 2.1
Step 2.1
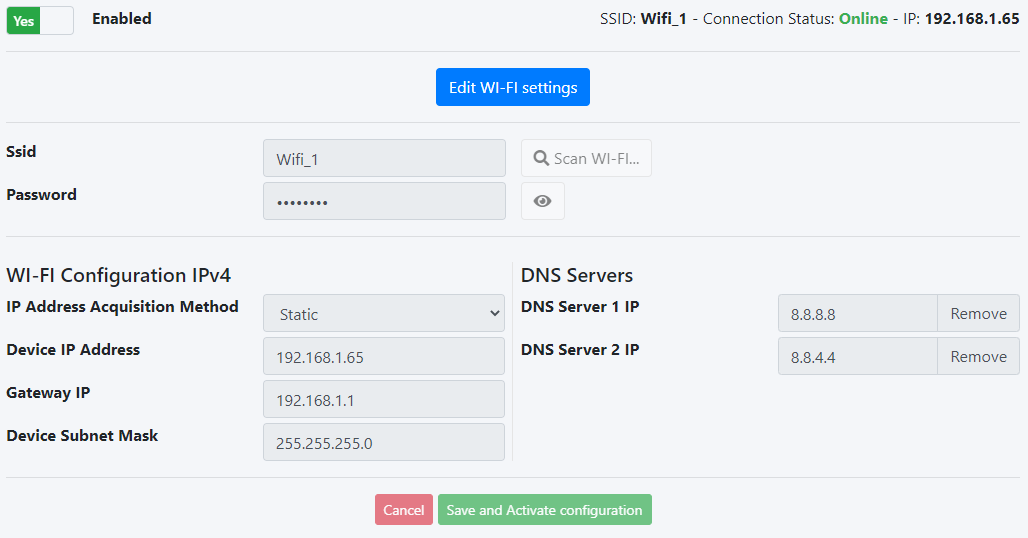
Wifi Configuration
Step 2.1
Step 2.1
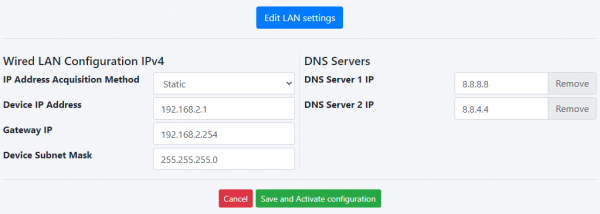
Visit the menu “Wifi Configuration” on the left side of the screen. Press the blue button “Edit WI-FI Settings” at the center of the page to change the Wifi parameters, then fill-in the boxes with your wifi SSID (the wifi name) and password. You can also use the button “Scan WI-FI” to automatically search the available networks. Press “Save and Activate configuration” to confirm the changes and wait few seconds to allow device to apply the new setup. In the example at the right, we set up a wifi connection with static IP address
Modem 2G/3G/4G LTE Configuration
Step 2.1
Step 2.1
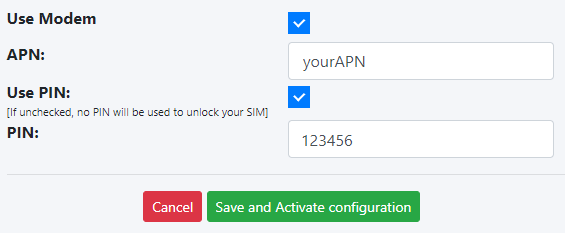
In case you have a Modem Device, you can setup the connection parameters by visiting the menu “Modem 4G/LTE Setup” on the left side of the screen and fill-in the boxes. Example below
Software Configuration
Default Parameters
The ResIOT® X8 gateway ships with some essential parameters already pre-configured. Below are their values
.Eth MAC Address: printed on the silver label on the back of the gateway
.IMEI: printed on the silver label on the back of the gateway
ATTENTION
The external power connector, if used, accepts a maximum input voltage of 24VDC
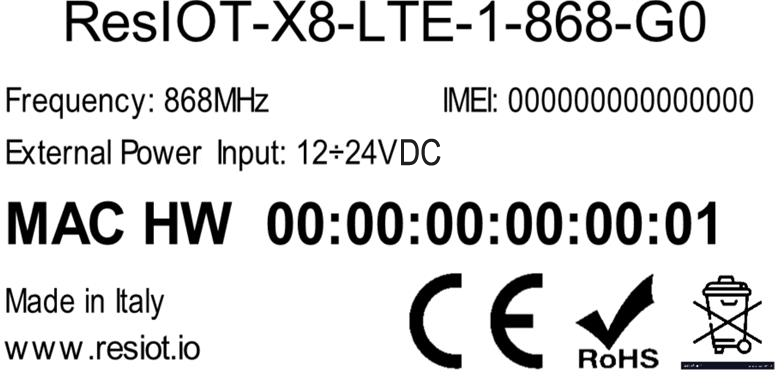
ResIOT® X8 label example
Step 1. Gateway Registration
Step 1.1
Step 1.2
Step 1.3
Step 1.1
Click on this link to access the registration page (if you don’t have an account, please create a new one on our portal)
Inside your gateway box you should have received some documents with the RGRA Serial label sticked on them. Keep it next to you because it is necessary for the next step. The label looks like the one on the right.
In this example RGRA serial is
UmAASU9UAAAAW5jcnlwdGurOJKUJAAAAwsSgAAYyU=
Step 1.2
Paste your RGRA Serial inside the proper text box, like in the picture below and press the Add button. You can find your gateway RGRA Serial on a label pasted on the documents inside your gateway box. RGRA Serials will keep saved in this page for your account
Step 1.3
You have now successfully registered your gateway! Proceed with the next steps of this guide to discover how to use your new device
Note: when you complete your gateway registration, a new table is generated at the bottom of the page. With this table you can get your gateways last statistics and access your devices form anywhere!
Below an output example
Step 2. Gateway Accessing & Network Configuration
Modem 2G/3G/4G LTE Configuration
Step 2.1
Step 2.1
The device is delivered with ChipSIM included, active and ready to use with traffic throughout Europe included for 36 months. It is not possible to deactivate the modem connection as it is the only web connectivity system present on the device.
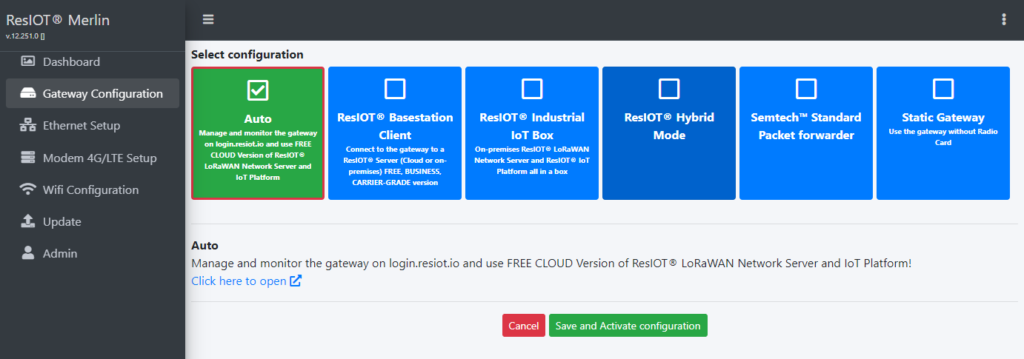
Step 3. Gateway Use Modes

AUTO (Default)
Step 3.1
Step 3.1
Manage and monitor your gateway on login.resiot.io, ready to use ResIOT® LoRaWAN® Network Server & IoT Platform FREE CLOUD VERSION (click here to access)
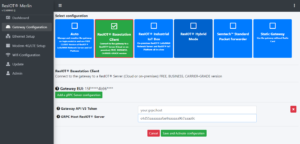
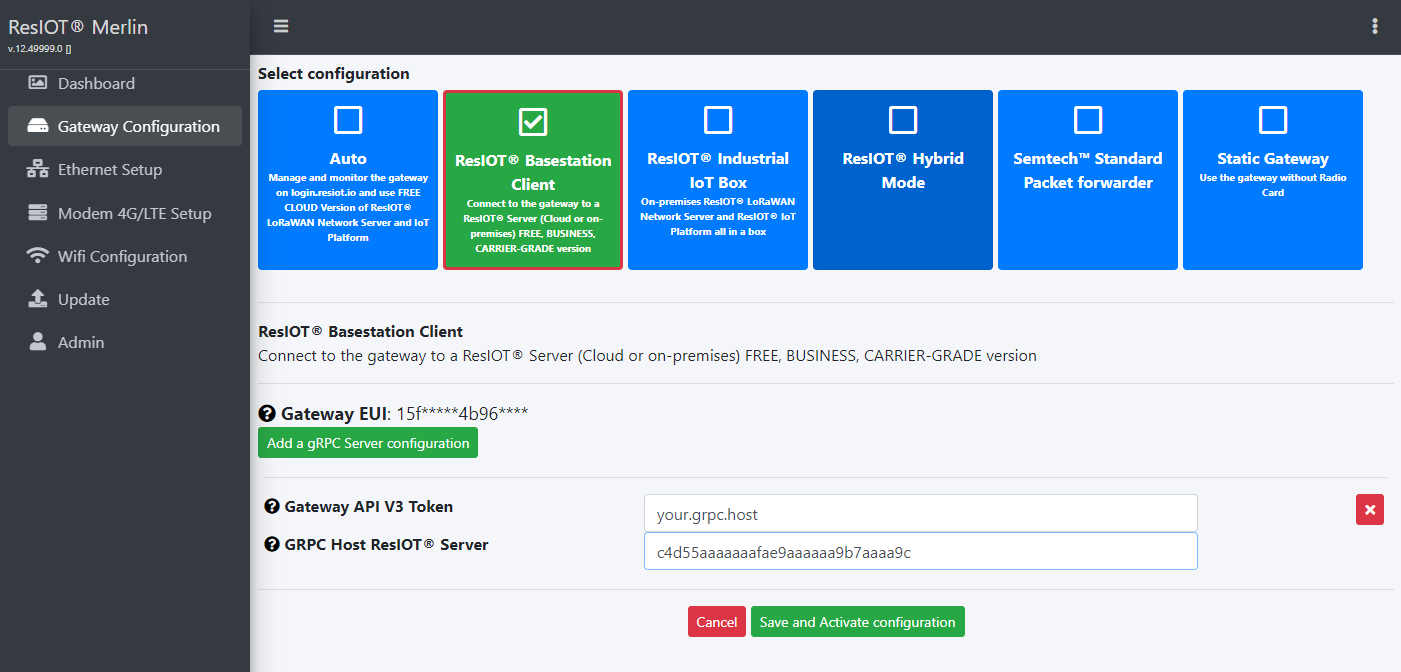
ResIOT® Basestation Client
Step 3.1
Step 3.2
Step 3.3
Step 3.4
Step 3.1
Connect your gateway to a ResIOT® Server (Cloud or On-premises) FREE, BUSINESS, CARRIER-GRADE versions. Below a quick guide on How to setup your ResIOT® Basestation Client with your ResIOT® Server

Step 3.2
Step 3.3
Step 3.4
The configuration is complete. Now just wait few seconds and your ResIOT® Server will auto-create the new gateway and will start to send packets for auto setup and recognition

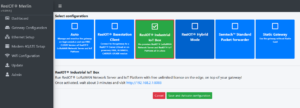
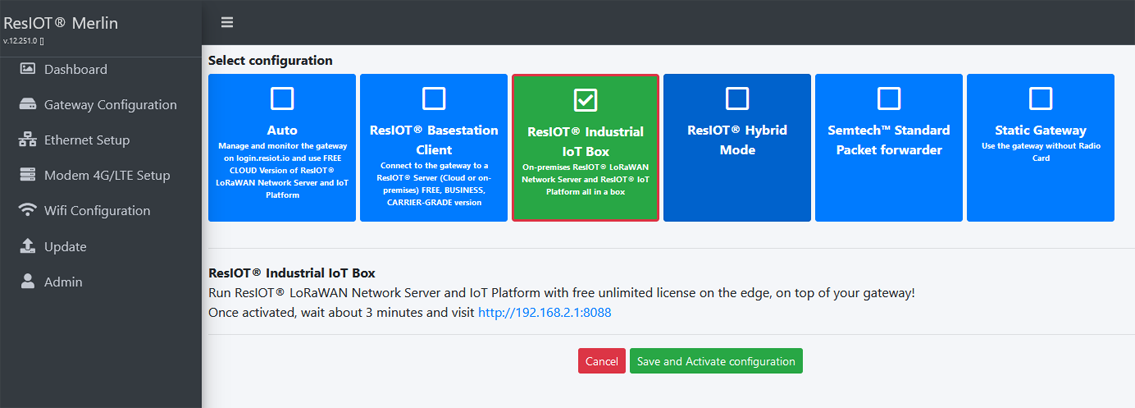
ResIOT® Industrial IoT Box
Step 3.1
Step 3.2
Step 3.3
Step 3.1
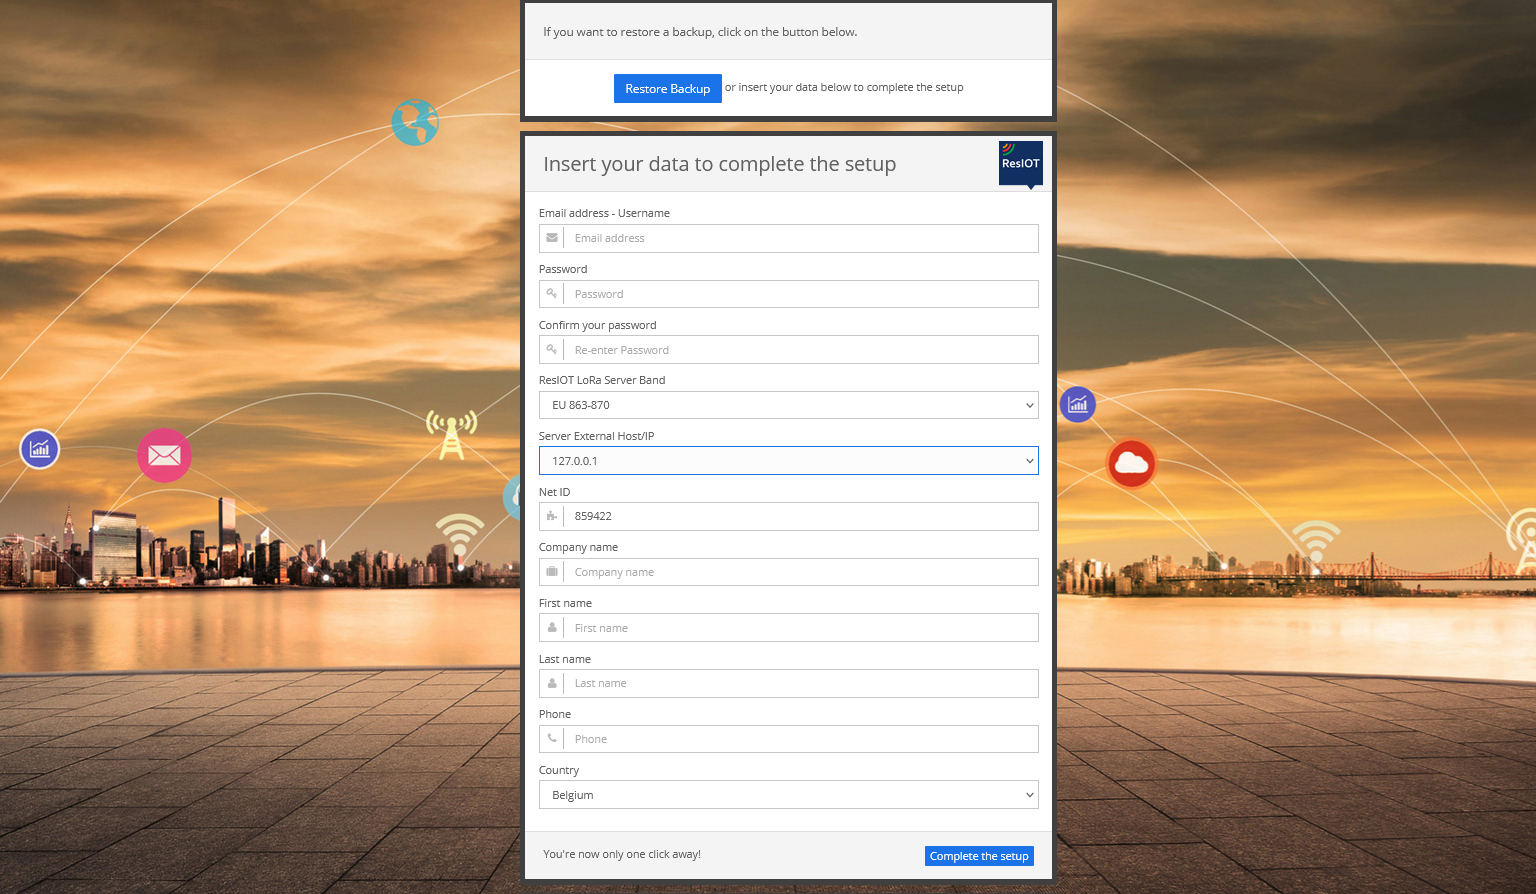
On-premises ResIOT® LoRaWAN® Network Server and ResIOT® IoT Platform all in a box with free unlimited license. Please wait up to 5 minutes after changing on this configuration for the first time in order to allow the gateway to start the ResIOT® Server. Below a quick guide on How to setup your ResIOT® IoT Box installation
Step 3.2

Semtech™ Packet Forwarder
Step 3.1
Step 3.1
Standard Semtech™ packet forwarder configuration
Optional Configurations
Firewall Configuration
If you need to configure your Firewall and you want to block unnecessary network traffic, please leave these IPs enabled for gateway remote managemente, ResIOT® Console and ResIOT® server(FREE, BUSINESS, CARRIER-GRADE)
- 34.78.157.72
- 35.195.250.173
- 54.36.116.92
- 35.187.11.138
- for ResIOT® Cloud, Business/Carrier-grade or on-Premises you need also to add the IP of your ResIOT® server installation
Correct disposal of the product
For the correct disposal of the product follow the instructions below:
Packaging box

Cardboard box PAP 20, paper collection. Dispose of as per municipal provisions for paper collection
Protective filling

Biodegradable chips. Disposal according to municipal regulation for the collection of organic waste
Gateway / Device product

Do not dispose with municipal waste or separate collection.
Dispose of in ecological island as per the provisions provided by the staff
How to install ResIOT® Base Station Client
We’re excited to announce the ResIOT® LoRaWAN® Base Station Gateway Client, a brand new tool from ResIOT you can install over your LoRaWAN® gateways.
Installing the ResIOT® LoRaWAN® Base Station Gateway Client will allow you to connect your LoRaWAN® gateway to our servers and to fully configure your LoRaWAN® gateway directly from the ResIOT core platform. Once installed and configured properly, you won’t need physical or remote access to your gateway anymore, or to edit json configuration files manually, the client will take care of it all for you!
Thanks to the ResIOT® LoRaWAN® Base Station Gateway Client, you will able to:
- communicate with the API of our ResIOT® platform via a secure, gzip enabled(low traffic) GRPC connection
- setup your gateway via ResIOT to connect automatically to the ResIOT platform
- automatically retrieve a valid gateway ID from our servers
- connect your gateway to network servers using TCP(via a Mosquitto protocol) instead of UDP
- automatically provision your gateway to our ResIOT servers. You will be able to start seeing alive messages in your log in no time
- remotely reboot your gateway
- add/modify the frequency plan, power level, tx gain and location of your gateway
- monitor your gateway resources remotely, such as RAM and CPU usage, free HD space and so on…
- review your gateway status over the Stats -> Gateway Stats ResIOT® page
- connect your gateway to multiple LoRaWAN® servers via udp
- automatically retrieve updates from our servers, your tools will keep auto-updated!
After downloading and installing the ResIOT® LoRaWAN® Base Station Gateway Client, all you have to do is retrieving the IP of your gateway and visit the following page in your browser: http://[YOURHOST]:50056
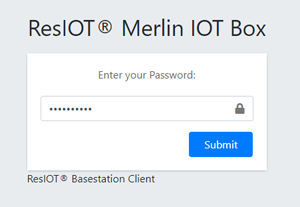
The first time you access your page you will be prompted to choose a password.
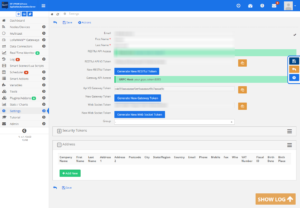
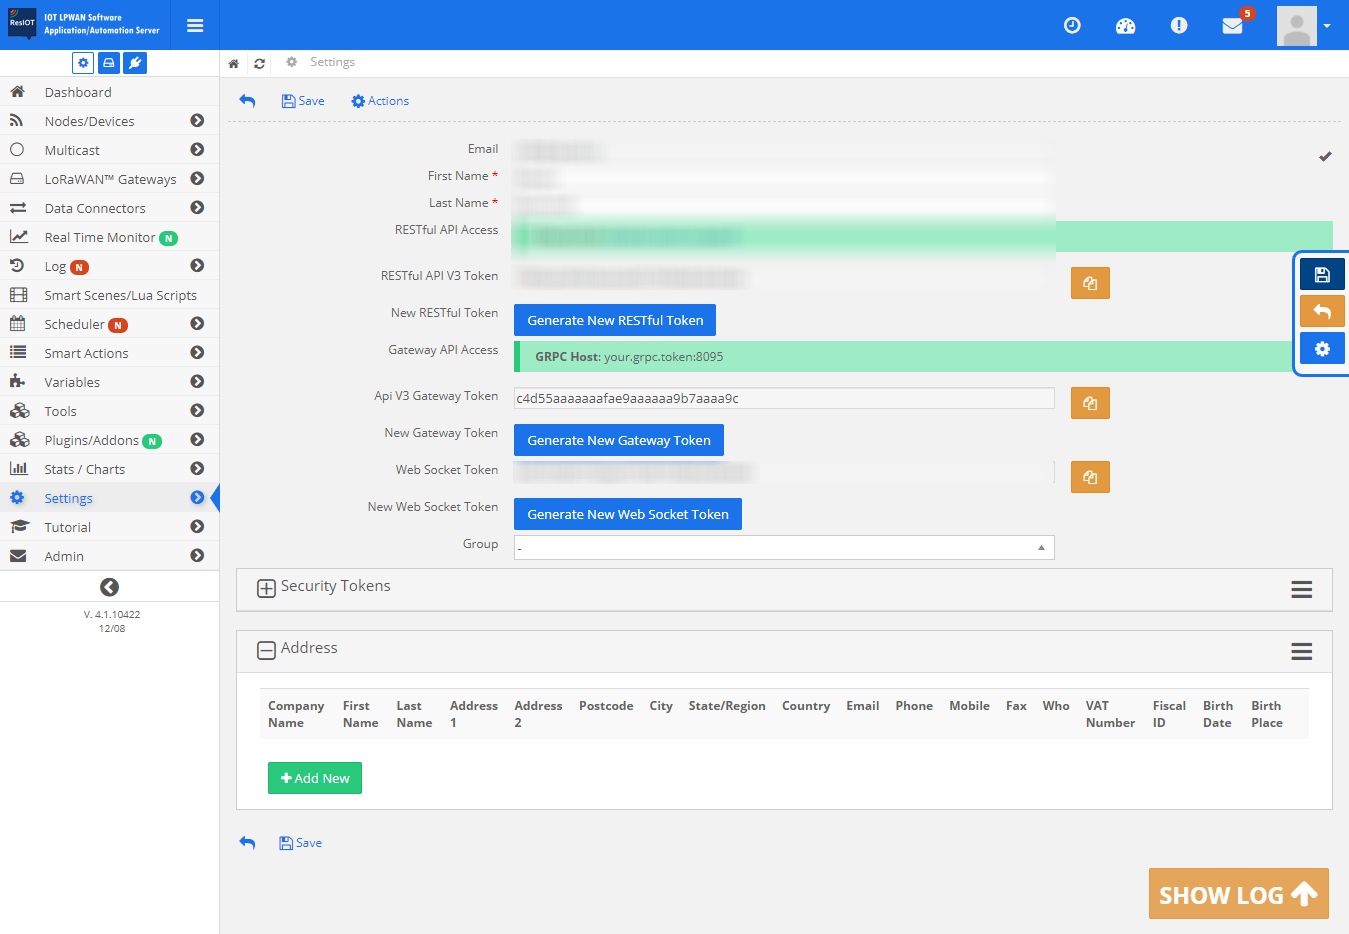
How to configure a gateway with ResIOT® LoRaWAN® Base Station Gateway Client
Login to your Gateway web panel. At the top of the page you can find the “Change API Token and GRPC Host” section. You will need to fill in those fields to connect the gateway to the network server. The api token is needed for the platform to confirm which user the gateway belongs. The GRPC Host is needed for the gateway to know where the ResIOT Api server is running.